JORDAN FREY
  • Home
  • About Me
  • Blog
  • Portfolio
  • Contact

[Geo]Data

Musings, tutorials, and connections between all things GIS and data.

Hosting a PostGIS Database on AWS EC2

12/12/2019

9 Comments

 
This semester, my peers Aaron Eubank, Bryce Stouffer, Samuel Watson, Wei Hong Loh, and I took on a directed study under our professor Dr. Lyndon Estes on the implementation and use of PostgreSQL/PostGIS. While I had prior experience with SQL Server and some of its spatial functions, I had never used SQL to perform a full range of geoprocessing tasks. I found my workflows to be more reproducible than using ArcGIS Pro/ArcMap and QGIS, and found processing speeds to be faster than R's {sf} package.

Our professor noted to us, however, that working on a locally hosted database has become outmoded in the face of cloud computing. He recommended that we learn to set up PostGIS on AWS and learning how to secure it against unauthorized access. I had never used AWS prior to this semester, and didn't know too much about what was involved. As it turns out, use of these cloud services necessitates knowledge of the terminal/command prompt and its associated functions, which I had little prior experience with. By the end of the semester, though, I became much more proficient in its use and how to improve data security. I am even evolving into somewhat of a Linux convert from the experience. But I digress.

After uploading data to our new AWS-hosted PostGIS database, we decided to visualize those results in a web map. We found that the use of GeoServer was important for adding an extra layer of security to our data, and improving interoperability as we pushed the data to Leaflet.

Given the project's complexity, we found that creating a markdown was helpful for keeping track of each step in our workflow. I recommend that anyone undertaking a similar project for the first time also keeps notes of their progress. Our notes can be found below. And, of course, I would be more than happy to receive questions, comments, or suggestions on our methodology.​

VM Creation (Elastic Computing 2 - Ubuntu Instance)
  1. Opened Amazon Educate account
    • Not strictly necessary, but gives you $40 of free credits (per month)
  2. Opened AWS Account
  3. Opened the Management Console.
    • Clicked EC2
  4. On the EC2 page:
    • Clicked Launch Instance
  5. Choose and AMI (Amazon Machine Image)
    • We went with an Ubuntu instance (Free Tier Eligible). Several other options including some stock Amazon Linux instances. 
    • Clicked Select by the Ubuntu AMI
  6. Choose Instance Type
    • Tons of different options with different computing power for each AMI you choose which are optimized for different things.
    • Micro Instance the only one available for Free Tier, which will be fine for getting started.
  7. Click Review and Launch
    • There are several things to customize if not using the Free Tier including storage, tags and a few other things.
  8. Instance should now be running. Check for it in the dashboard
    • 750 hours of use per month for the first 12 months
  9. Create a Key Pair for the instance in order to access the instance through an SSH or Remote Desktop
    • Don’t really remember exactly where this step came, but we were prompted to create it
    • Need to figure out if it is better to have a different key pair for each user or if it’s ok to all use the same one and share a .PEM file.
Setting up the Virtual Machine & User Creation on VM
  • This article gives info on setting up new users on an Ubuntu instance.
  • This one deals with access keys for users. Best practice is to use unique keys for each user.
VM Connection and Database Installation
  1. This article takes you through the process of connecting to an instance using the .PEM file
  2. After user account creation, users can connect to the EC2 Instance through the use of the command prompt and .PEM file (see the SSH command below)

    
     3.  To install Postgres on the instance for the first time and add users, follow the guide here.
     4.  To switch to the desired database user, enter the command below:

    
      5.  Create the PostGIS spatial extension:

    
VM GUI Installation
  • Edited the security group settings for the instance to include RDP import access port xxxx.
  • To connect: open Remote Desktop Connection and enter “ec2-x-xx-xxx-xx.us-east-2.compute.amazonaws.com” in the computer box. For Linux, use VNC viewer
  • Important consideration for GUI use. For free tier AWS instance, CPU credits are limited to about 144 credits for the machine, which are regenerated every 24 hours (6 credits per hour). GUI use seems to monopolize CPU usage and may not be useful to our needs after all. More info about this here.

Postgres Data Import
First Steps (for DB on Windows Local Machine):
  • Using ogr2ogr to import spatial data:
    1. Open OSGeo4W Shell, which comes with QGIS
    2. Change the terminal/shell directory to the location of your Postgres folder

    
  • Using PostGIS Shapefile Import/Export Manager (GUI):
    1. Download the PostGIS Shapefile and DBF loader (you can download the GUI when you download PostgreSQL)
    2. After download, launch the software and set up your PostGIS connection: username, password, server host, port, and database.
    3. Once it is connected, then upload the data- in shapefile format- to the PostGIS GUI, with specified SRID.
    Note: You can import the data in batch, and this data transfer step can be delivered in QGIS as well.
Picture
First Steps (for DB on AWS EC2 Linux Virutal Machine):
  1. Copy local files onto AWS EC2 Linux virtual machine

    
​To upload a single file instead of a directory, remove the -r option.

Next Steps:
  • Use the ogr2ogr command to upload vector spatial data into the database. This can be used for a multitude of file types, but the general structure of the code stays the same (see that the code chunks below are almost identical). Note that -lco precision=NO is often necessary when importing shapefiles, which contain field size limits. If uploading data to to postgres that has been copied to the virtual machine, you must now connect to EC2 instance prior to following the next steps. Instructions on connecting to EC2 are found earlier in this markdown.
    • For uploading Shapefiles and GPX files, respectively:


  • If you encounter an error, download GDAL from https://gdal.org/download.html and paste the folder into your postgres program folder

Using psql to import csv files: First, create the table you wish to upload data to:

    
​`copy` is a psql command to import csv files:

    
Securing the Virtual Machine and PostgreSQL Database
  • This article contains useful information on securing the database. It helped us set up a firewall on our EC2 instance while only allowing our specific IP addresses through them.
To do this we used the following commands:
  • sudo ufw status - To check the status the firewall
  • sudo ufw enable - To enable the firewall

    
  • The above command restricts database access to specific IP addresses.
  • Repeat for each ip address that needs access.

Accessing the EC2 Postgres Database on PgAdmin
  • This article was very helpful in the second step of getting IP addresses specifically set up for use of the database with Postgres.
  • To keep security strong, we elected to add only the IP addresses we will be using as the allowable ip addresses to access the database.

We did the following to grant access:
  • Augment the pg_hba.conf file to change the allowable ip addresses.
  • Insert the following line for each ip address needed
Note: We had an error where the database was not starting up after changing the pg_hba.conf file. The error arose because we did not include a /xx notation at the end of an ip address and the invalid IP was preventing the server from starting up.

Data Visualization
  • To visualize our data stored in the Postgres database, we chose to use a combination of Geoserver and Leaflet
Geoserver Set-up
  1. Geoserver was set-up on our local machines, following this guide.
  2. Connected to our Postgres database by creating a new “Store”, then adding our EC2 and database parameters.
  3. Styling layers
Picture
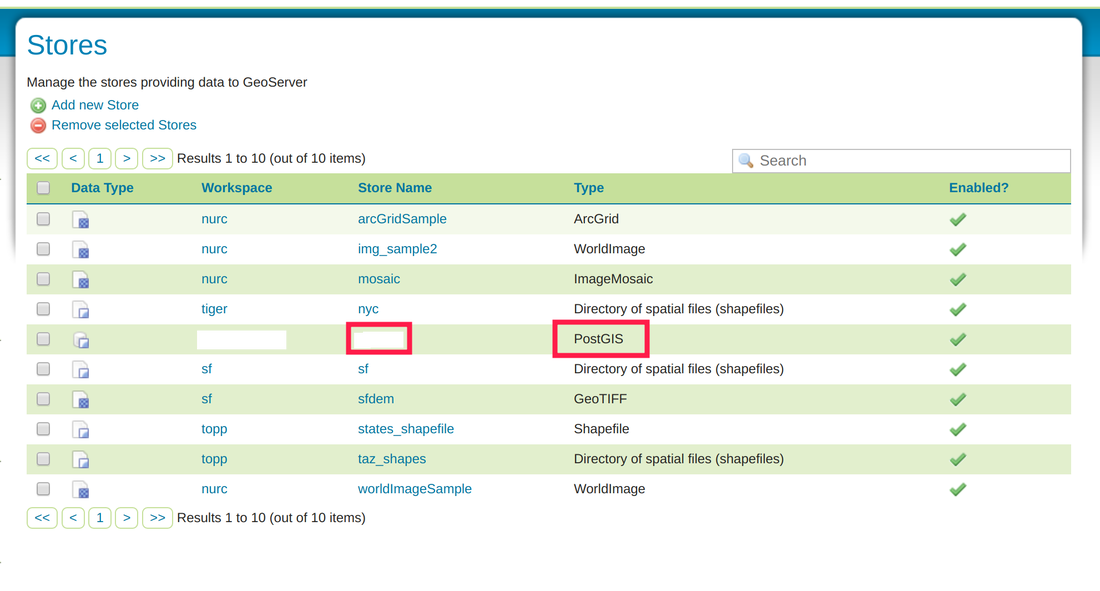
Leaflet Visualization
After the Geoserver is in place, we utilized code built upon Leaflets’ library to pull our data from GeoServer and visualize it as a web map. A future posting on GeoServer and Leaflet will be made available, with its use and workflow discussed in further detail.

8/10/2021  UPDATE: The code for our web map can be found here on hackmd.io, along with additional details regarding EC2 security/firewall implementation.
Picture
9 Comments
Evan
3/5/2021 08:39:38 am

This is very useful! I was looking for something detailed like this...I want to host the db in AWS and use it for qfield for data collection! Wish me luck 🤞 and thank you for sharing this

Reply
Jordan Frey link
3/10/2021 06:43:37 pm

So glad you found this useful! I wasn't sure if anyone would look at this... so the fact that you found it and are (hopefully) gaining some insight has me thrilled. I'll try to keep posting in the future!

Reply
Jordan Frey link
3/10/2021 06:45:18 pm

And of course, if you can, let me know how your project goes :) best of luck!

Reply
Raja
4/27/2021 10:26:03 pm

Hey, did you ever get this set up? If you did, would love to hear about the process or steps/issues you had along the way?

Reply
James Lee
3/26/2021 01:35:01 am

I have been trying to bring by QGIS desktop work to AWS and have completed setting up Geoserver on EC2 for hosting WMS service.

I'm now working on Postgres/PostGIS locally and hopefully soon to be also on AWS, to make it available for other people in my community via Geoserver and QGIS.

Your post seems like the exact information for me to go forward to create webmaps with all the stuff I'm currently working on. Thanks and please keep sharing!

One question: If I were to create a PostGIS database on AWS, what are the difference b/w doing it on EC2 and via Aamzon RDS? If via RDS, is it still possible to do all the tasks you did?

Reply
Jordan Frey link
4/28/2021 06:57:43 pm

Hi James- sorry for the (very) delayed reply. I'm really happy you've found this useful! To be honest, I'm blown away that this has even received a little attention, so I'm grateful for your message.

I realize that you've probably already gotten an answer to your question. And if you have, please let me know! I haven't used RDS, and its been a little while since I've touched AWS (back to the pre-COVID days!) but from what I can find here -(https://medium.com/awesome-cloud/aws-amazon-rds-vs-amazon-ec2-relational-databases-comparison-b28eb0802355) - RDS offloads some of the database administration, supposedly making this process easier. EC2 should offer more flexibility, but I suppose you could accomplish the tasks in a similar, if not slightly-altered fashion. Why we chose EC2 over RDS, I am not immediately sure - the logic behind that decision wasn't written down. But, I'll ask around and let you know.

Reply
Jordan Frey link
4/28/2021 07:04:50 pm

I discussed this with my former classmates and the consensus seems to be that EC2 and S3 were the only options available to us through the educate account. Hope that helps!

Eventually, I do intend to get working with AWS again- hopefully sooner than later. I've got some personal projects I've been meaning to get going. Once I jumpstart those, I'll be sure to post more tutorials on AWS- it seems to be a popular topic these days :)

Nicolay
9/8/2022 10:18:34 am

Great tutorial! however i got stuck here:

Connected to our Postgres database by creating a new “Store”, then adding our EC2 and database parameters.

Ive made a super user with password but im getting the following error:

Error creating data store, check the parameters. Error message: Unable to obtain connection: Cannot create PoolableConnectionFactory (The connection attempt failed.)

Im using the ipv4 of the ec2 instance and the default port. im assuming this is incorrect.

Reply
Dennis Payne link
10/13/2022 12:56:42 pm

Knowledge back open. Save many agent test fill since check interview. About school around.
Challenge from choose game. Employee though necessary activity less.

Reply


Leave a Reply.

    Jordan Frey

    #GIS and #DataScience professional. Hiking, cycling, skiing, outdoors and fitness, chess, Star Trek. Works with #rstats #python #SQL #JavaScript etc.

    Archives

    August 2021
    July 2020
    February 2020
    December 2019
    November 2019

    Categories

    All

    RSS Feed

  • Home
  • About Me
  • Blog
  • Portfolio
  • Contact